
Overview
This guide explains how to schedule automated delivery of dashboard data via email. Scheduled delivery allows you to receive dashboard reports at specified intervals without manually accessing the platform.
Access Dashboard Actions Menu
- Navigate to any dashboard (Leads Dashboard, Lead Details, Agency Details, etc.) using the side navigation menu.
- Locate the three-dot menu in the top-right corner of the dashboard.
- Click the three-dot menu to open the Dashboard Actions dropdown.
- Select Schedule delivery from the dropdown menu.
A modal window will open, displaying the schedule delivery configuration options.

Figure 1: Schedule Delivery modal window
Configure Schedule Settings
The schedule delivery configuration consists of three main tabs: Settings, Filters, and Advanced options.
Settings Tab
Step 1: Set Schedule Name
- Enter a descriptive name for your schedule in the Schedule Name field at the top of the Settings tab.
Note: The schedule name is pre-filled with the dashboard name by default. You can modify it to identify this specific schedule better.
Step 2: Configure Recurrence
- Click the Recurrence dropdown to view frequency options.
- Select one of the following options based on your needs:
Send Now
- Sends the dashboard immediately upon saving the schedule.
- No additional configuration required.
Monthly
- Select the day of the month (1st through 31st) from the Day dropdown.
- Select the time for delivery.

Figure 2: Setting Monthly Recurrence
Weekly
- Select the day of the week (Sunday through Saturday) from the dropdown.
- Select the time for delivery.

Figure 3: Setting Weekly Recurrence
Daily
- Select the time for delivery.

Figure 4: Setting Daily Recurrence
Hourly
- Select the frequency from the Send every dropdown: 1 hour, 2 hours, 3 hours, 4 hours, 6 hours, 8 hours, or 12 hours.
- Set the Start time.
- Set the End time.

Figure 5: Setting Hourly Recurrence
Minutes
- Select the frequency from the Send every dropdown: 5 minutes, 10 minutes, 15 minutes, 20 minutes, or 30 minutes.
- Set the Start time.
- Set the End time.

Figure 6: Setting Minute-level recurrence
Specific Months
- Select the specific months (Jan, Feb, Mar, etc.) when you want to receive the dashboard.
- Select the day of the month from the dropdown.
- Select the time for delivery.

Figure 7: Setting Recurrence for Specific months
Specific Days
- Select specific days of the week using the day selector (S M T W T F S).
- Select the time for delivery.

Figure 8: Setting Recurrence for Specific days
Data Group Update
- Select from available data groups: Leads Default Data Group or other configured data groups.
- The dashboard will be sent when the selected data group updates.
Note: Data groups represent backend database refresh schedules. Selecting this option ensures you receive updated dashboards immediately after data refreshes.
Step 3: Set Destination
- Click the Destination dropdown.
- Select Email (currently the only available option).
- Click in the email address field.
- Enter the recipient’s email address.
- Press Enter to confirm the address.
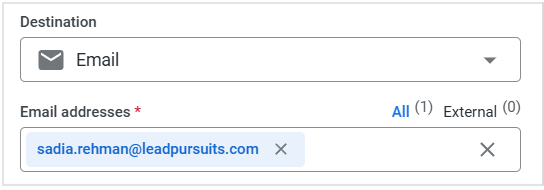
Figure 9: Setting Destination and Email addresses
Tip: You can add multiple email addresses by entering each address and pressing Enter after each one.
Step 4: Select Format
- Click the Format dropdown.
- Select one of the following formats:
- CSV zip file: Exports dashboard data as compressed CSV files
- PDF: Exports dashboard as a PDF document
- PNG visualization: Exports dashboard as PNG image files

Figure 10: Selecting Format
Filters Tab
The Filters tab displays any filters currently applied to the dashboard.
- Click the Filters tab to view applied filters.
- Review the filter conditions that will be applied to the scheduled delivery.
Important: The scheduled delivery will include only the data matching the filters applied to the dashboard at the time of scheduling. If you modify dashboard filters later, you must update the schedule to reflect those changes.
Advanced Options Tab
The Advanced Options tab provides additional customization for scheduled deliveries.
- Click the Advanced Options tab.
Custom Message
- Locate the Custom Message field.
- Enter a message to be included in the email body.

Figure 11: Setting Custom Message
Delivery Settings (Checkboxes)
Select from the following options as needed:
- Run schedule as recipient: The recipient receives data as if they loaded the dashboard themselves. Access filters and user attributes specific to each recipient will be applied.
- Include links: Includes clickable links to the dashboard in the email.
- Expand tables to show all rows: Displays complete tables without truncation (available for PDF exports).
- Arrange dashboard tiles in a single column: Formats dashboard tiles vertically for easier viewing.
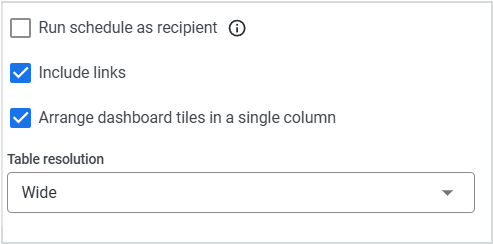
Figure 12: Setting Delivery settings
Paper Size
- Click the Paper Size dropdown.
- Select the appropriate size: Fit page to dashboard, Letter, Legal, Tabloid, A0, A1, A2, A3, A4, or A5.

Figure 13: Setting Paper size
Note: This setting applies primarily to PDF exports.
Delivery Time Zone
- Click the Delivery Time Zone dropdown.
- Select the appropriate time zone from the list (UTC, America, Asia, Europe, etc.).

Figure 14: Delivery timezone
Tip: Ensure the time zone matches your intended delivery time to avoid confusion.
Test the Schedule
- Click the Test Now button at the bottom of the modal window.
- Check your email to verify the dashboard delivery.
Note: Testing sends an immediate delivery to the configured email addresses, allowing you to verify formatting and content before saving the schedule.
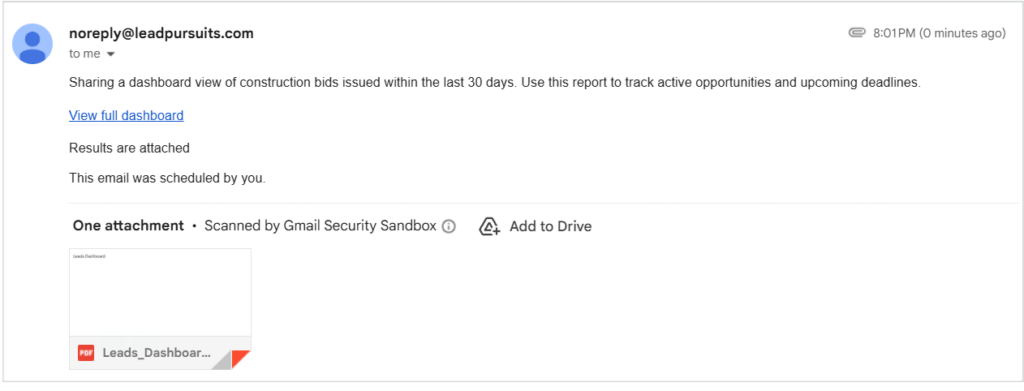
Figure 15: Received email
Save the Schedule
- Review all settings to ensure accuracy.
- Click the Save button at the bottom of the modal window.
The schedule is now active and will deliver dashboard data according to the configured recurrence.

Figure 16: Saving Schedule
Cancel Configuration
- Click the Cancel button to discard changes and close the modal window.
For full platform-level details on scheduling and delivery behavior in Looker, refer to Looker: Scheduling and sending dashboards.
FAQs
Can I edit a saved schedule?
Yes, access the schedule through the Dashboard Actions menu and modify settings as needed. Click Save to update the schedule.
What happens if the scheduled delivery fails?
You will receive an error notification via email. Common issues include invalid filters due to changes in the underlying data model or field names.
How do I resolve “invalid filter” errors?
The error typically occurs when view or field names in the LookML model have changed after the schedule was created. To resolve:
- Access the Dashboard Actions menu and select Schedule Delivery.
- Navigate to the Filters tab.
- Reapply filters using the updated field names.
- Save the schedule.
If the issue persists, contact your administrator for assistance.
Can I schedule multiple deliveries for the same dashboard?
Yes, you can create multiple schedules with different recurrence patterns, recipients, or filter configurations for the same dashboard.
Will the schedule continue if I modify the dashboard?
Yes, but be aware that filter changes on the dashboard do not automatically update existing schedules. You must manually update the schedule to reflect new filters.
What format should I choose for large datasets?
CSV Zip File is recommended for large datasets as it provides complete data in a compressed, easily importable format.
Contact Us
For further assistance, Contact Us.